My niece Ana is the girliest tomboy I know-- she's all about running around and finding new things to get in to, but if you ask her to dress herself, chances are she's going to come out in pink and purple! Her birthday was a few weeks ago, and I really wanted to see if I could re-make this "wreath" but in a more kid-friendly way (she's Pre-K) and on a slightly smaller scale since it would have to travel across the Pacific Ocean:
(via)
Here's the final version of mine-- I did forget to put something up there to hang it with, buuuut they'll figure it out. I would suggest using the coke top trick or wrapping the yarn like the inspiration piece.
It turned out pretty well, I think, for winging it, and a step by step tutorial is below!
Materials: Yarn, wooden frame, wooden letter, embellishments, scissors.
Cost: About $15, which includes the yarn and glue that I'll use again.
Time: Wow. Wrapping things in yarn is really involved-- it probably took me three hours, maybe even four. It was stop and go, so I don't want to include the down time, but it was pretty involved!
Conclusion: Yeah, it was involved, but I'll totally do this again. I didn't have the time to paint the frame like the inspiration piece, but depending on the person it may be just as well to wrap it in yarn-- everyone at work wanted one!
Tips and tricks: I purchased a smaller wooden frame and a smaller letter at Michael's for about $1 each-- you could go with a bigger one like the inspiration piece, but you'll just spend more time on it! (and probably more money unless you have leftover frames lying around!)
Gather all your materials-- I'm not very good at this yet, so that's why the A already has yarn attached to it...
Pink yarn, to be specific
All of my yarn wrapping involved healthy doses of glue-- it dries clear and makes ya look super crafty and talented!
Front of the A fully wrapped
Back of the A fully wrapped
Tail of the A-- it won't look perfect because it's super awkward, but you just have to play around with it to get the right look
And on the tip, we have lots of glue and layered yarn!
To start on the frame? Dot of glue. Totally dot of glue.
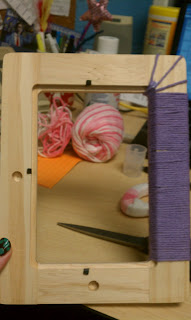
First side wrapped-- I thought the detail on the corners added a little flair to it. There was glue involved in this as well...
The dark spots are the brackets that used to hold the frame back in place-- I bent them all the way back using the handle on my scissors to push them all the way down. They stuck out a little, but after they were covered in yarn, they didn't pose a threat by design or by poking.
I left the bottom corner open so that I could add the flowers in...
A in the middle
I decided to get fancy and try to "suspend" the A in the middle-- this took a lot of playing around to get the tension right and the color on color right.
Close up of the wrapping-- you want to know what there's a lot of in this picture? Glue.
Flower one... these are bigger than I thought!
The tie off on the second half of the tension string. I had to run it through the top and then back through to the bottom corner to make sure the letter had enough tension and support.
Back of the frame at the end
I still had another flower, and the good thing about making a present for a little girl is that they love everything over the top!
Final product without the flash-- does a good job of emphasizing the tension strings!


No comments:
Post a Comment